Welcome to the complete instruction manual on how to build your own WordPress site from scratch.
Step 1: Choosing a WordPress Site Host
Before building a WordPress site, the first decision you’ll need to make is choosing a reliable hosting provider. A web host is the service that stores your website’s files and makes them accessible to visitors on the internet. Without it, your website can’t exist online.
Why a Good Host is Important:
Choosing a quality host will impact how:
- Fast your site loads
- Reliable it stays online (uptime)
- Secure your content is
- Easy it is to install WordPress and manage your website
If you go with a poor host, you may experience downtime, slow loading times, security vulnerabilities, and lack of support when you need help.
What to Look for in a Good WordPress Host:
When evaluating a hosting provider, look for these key features:
| Criteria | Description |
|---|---|
| WordPress Compatibility | Some hosts offer 1-click WordPress installation |
| Uptime Guarantee | Aim for at least 99.9% uptime |
| Speed & Performance | Faster servers = better user experience |
| Security | SSL certificates, firewalls, malware protection |
| Customer Support | 24/7 live chat is ideal for quick help |
| Scalability | Ability to upgrade as your site grows |
| Cost | Watch out for low intro prices followed by high renewal fees |
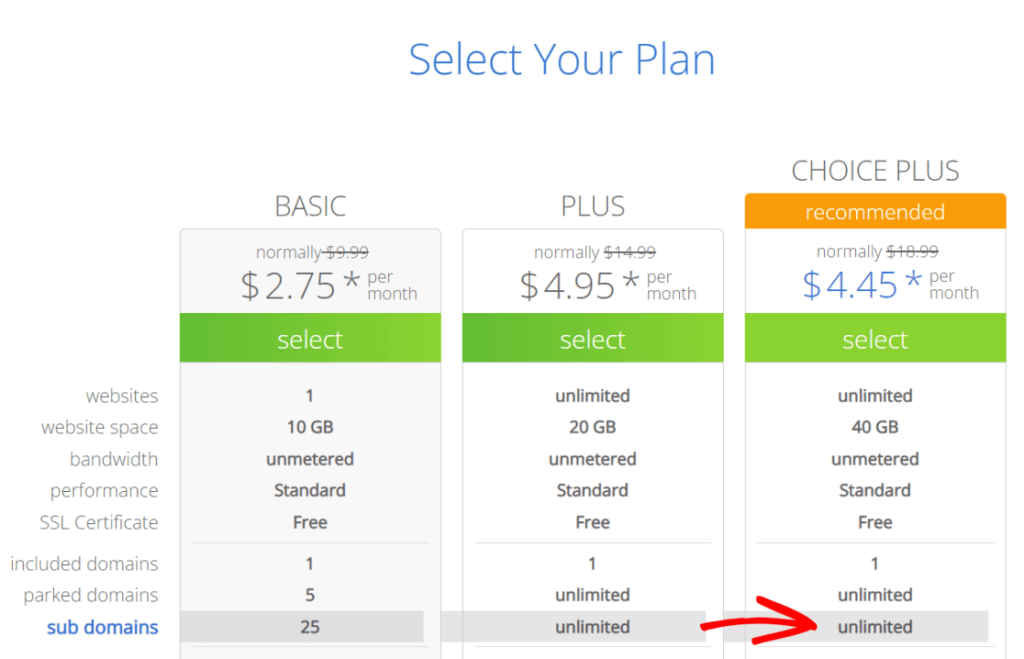
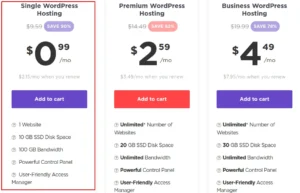
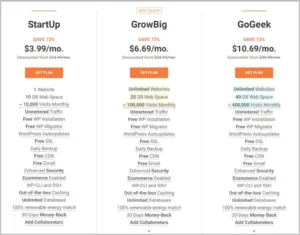
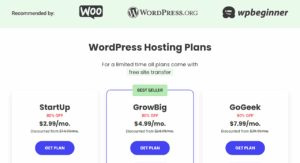
Examples of Reliable WordPress Hosts:
Here are a few trusted hosting providers that are beginner-friendly and WordPress-ready:
| Host | Highlights | Website |
|---|---|---|
| Bluehost | Official WordPress recommendation, easy setup | bluehost.com |
| SiteGround | Great support, strong security | siteground.com |
| Hostinger | Affordable, beginner-friendly | hostinger.com |
Step 2: Installing WordPress
Why This Step Is Crucial
Installing WordPress is the foundational step in building your website. It sets up the core files and database that power your site’s content and functionality. A proper installation ensures that your site runs smoothly and securely.
Installation Methods
There are two primary methods to install WordPress:
- One-Click Installation via Hosting Provider: Many hosting providers offer a simplified installation process through their control panels.
- Manual Installation: This method involves downloading WordPress, uploading it to your server, and configuring it manually.
One-Click Installation (Using Bluehost as an Example)
Most hosting providers, like Bluehost, offer a one-click installation feature. Here’s how to use it:
- Log in to your hosting account.
- Navigate to the control panel (cPanel).
- Locate the WordPress installer under the “Website” or “Softaculous Apps Installer” section.
- Click on the WordPress icon and then click “Install Now”.
- Fill in the required details:
- Site Name
- Site Description
- Admin Username
- Admin Password
- Admin Email
- Choose the domain where you want to install WordPress.
- Click “Install” and wait for the process to complete.
Manual Installation
If you prefer to install WordPress manually, follow these steps:
- Download WordPress: Go to wordpress.org/download and download the latest version.HostGator+1WordPress Developer Resources+1
- Upload to Server: Use an FTP client to upload the WordPress files to your server’s root directory.WordPress Developer Resources
- Create a Database:
- Access your hosting control panel.
- Navigate to “MySQL Databases”.
- Create a new database and user, then assign the user to the database.HostGator+1WPExplorer+1
- Configure wp-config.php:
- Rename the
wp-config-sample.phpfile towp-config.php. - Open it and enter your database details.WordPress Developer Resources+1HostGator+1WIRED
- Rename the
- Run the Installation:
- In your browser, go to
http://yourdomain.com/wp-admin/install.php. - Follow the on-screen instructions to complete the installation.
- In your browser, go to
After installation, you can log in to your WordPress dashboard by navigating to http://yourdomain.com/wp-admin and entering your admin credentials. From there, you can begin customizing your site by selecting themes, adding plugins, and creating content.
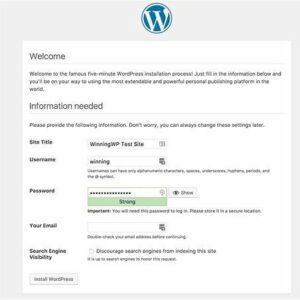
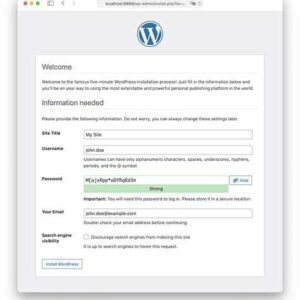
This screen welcomes you to the WordPress installation process, prompting you to enter essential site information.
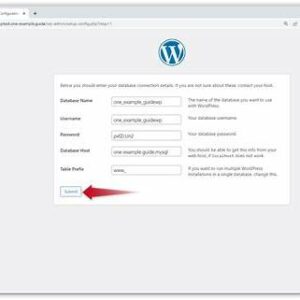
Here, you input your database name, username, password, and host information to connect WordPress to your database.
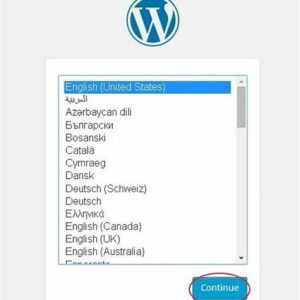
Select your preferred language for the WordPress dashboard and site interface.
Confirmation that WordPress has been successfully installed, providing your login credentials.
Step 3: Selecting and Installing a Theme
Why This Step Is Important
A WordPress theme determines the overall look, feel, and functionality of your website. Choosing the right theme is crucial because it affects user experience, site performance, and even search engine rankings. A well-chosen theme ensures that your website is responsive, accessible, and aligned with your brand identity.
How to Select a WordPress Theme
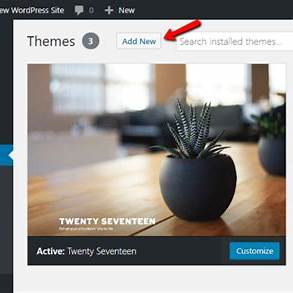
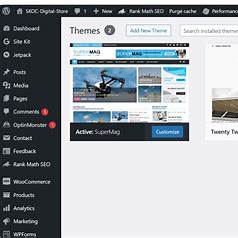
- Navigate to the Themes Section:
- From your WordPress dashboard, go to Appearance > Themes.Hostinger+3WordPress Tutorial Videos by WP101®+3WPBeginner+3
- Add a New Theme:
- Click on the Add New button at the top of the page.
- Browse or Search for Themes:
- Use the search bar to find themes by name or keyword.
- Utilize the Feature Filter to narrow down themes based on layout, features, and subject.Learn WordPress+1Bluehost+1
- Preview Themes:
- Hover over a theme and click Preview to see how it would look on your site.Hostinger
- Install and Activate:
- Once you’ve chosen a theme, click Install, and then Activate to apply it to your site.
After activating your chosen theme, you can further customize it by navigating to Appearance > Customize. Here, you can adjust settings like colors, fonts, and layout options to better match your brand and preferences.
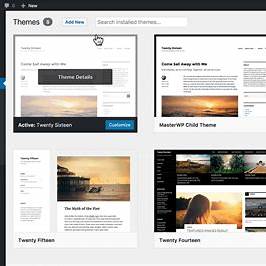
Navigate to the Themes section from the WordPress dashboard.
Click on the “Add New” button to browse available themes.
Utilize the Feature Filter to narrow down theme options based on specific criteria.
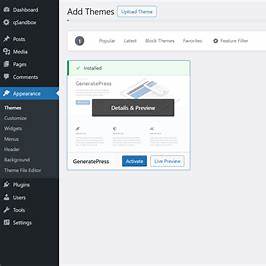
Preview a theme to see how it would look on your website before installing.
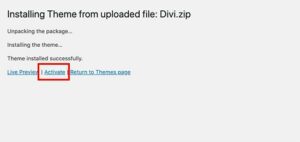
Install and activate the selected theme to apply it to your website
Step 4: Adding Users and Understanding User Roles
Why This Step Is Important
Managing user roles in WordPress is crucial for maintaining site security and ensuring efficient collaboration. Assigning appropriate roles to users helps control access to various site functionalities, preventing unauthorized changes and streamlining content management.
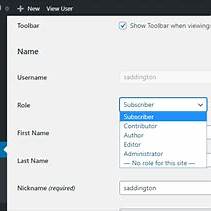
Understanding WordPress User Roles
WordPress offers several predefined user roles, each with specific capabilities:Cloudways+1wpuserregistration.com+1
- Administrator: Has full access to all site features, including theme and plugin management, user administration, and content control.WP Engine
- Editor: Can publish and manage posts and pages, including those created by other users.NameHero+5WordPress.org+5Jetpack+5
- Author: Can publish and manage their own posts.NameHero+5WordPress.org+5WordPress.com+5
- Contributor: Can write and manage their own posts but cannot publish them.Kinsta®+3WordPress.org+3WordPress.com+3
- Subscriber: Can manage their profile and view content but cannot create or manage posts.
Assigning the correct role ensures users have access only to the functionalities necessary for their responsibilities. Jetpack+4Hostinger+4WPBeginner+4
How to Add a New User in WordPress
- Navigate to Users > Add New:
- From your WordPress dashboard, go to the left-hand menu and click on Users, then select Add New.
- Fill in User Details:
- Enter the new user’s Username and Email. You can also add their First Name, Last Name, and Website (optional).
- Set a Password:
- Click on Show password to generate a password or enter a custom one.
- Assign a Role:
- From the Role dropdown menu, select the appropriate role for the user.
- Send User Notification:
- Check the box to send the new user an email about their account.
- Add New User:
- Click the Add New User button to complete the process.
Properly managing user roles is essential for maintaining the integrity and security of your WordPress site. Regularly review user roles and permissions to ensure they align with current responsibilities and access requirements.

Navigate to the “Add New User” section from the WordPress dashboard.

Enter the new user’s information, including username, email, and role assignment.
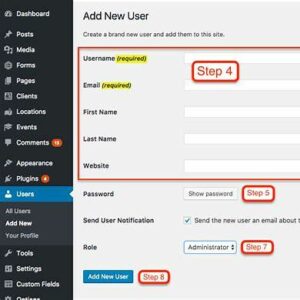
Select the appropriate role for the new user from the dropdown menu.
A visual representation of the capabilities associated with each user role.
Step 5: Evaluating Plug-Ins
Why This Step Is Important
Plugins are essential tools that extend the functionality of your WordPress site, allowing you to add features like contact forms, SEO optimization, security enhancements, and more. However, not all plugins are created equal. Evaluating plugins before installation is crucial to ensure they are reliable, secure, and compatible with your site.
How to Evaluate WordPress Plugins
When considering a plugin, assess the following criteria:
- Source: Only install plugins from reputable sources, such as the official WordPress Plugin Directory.
- Reviews and Ratings: Check user reviews and ratings to gauge the plugin’s reliability and performance.Liquid Web
- Active Installations: A high number of active installations indicates trustworthiness and widespread use.
- Last Updated: Ensure the plugin has been updated recently to maintain compatibility with the latest WordPress version.Liquid Web
- Compatibility: Verify that the plugin is compatible with your version of WordPress.
- Support: Look for plugins with active support forums or responsive developers.BoldGrid
- Security: Research any known vulnerabilities associated with the plugin.Wikipedia
- Performance Impact: Consider the plugin’s impact on your site’s loading speed and overall performance.
- Documentation: Comprehensive documentation indicates a well-maintained plugin.
- Testing: Whenever possible, test the plugin in a staging environment before deploying it on your live site.
How to Install a WordPress Plugin
- Navigate to Plugins > Add New:
- From your WordPress dashboard, go to the left-hand menu and click on Plugins, then select Add New.
- Search for a Plugin:
- Use the search bar to find a plugin by name or functionality.
- Evaluate the Plugin:
- Click on the plugin’s name to view details, including description, ratings, reviews, and compatibility information.WordPress.com
- Install the Plugin:
- Click the Install Now button.Dopinger+2WPZOOM+2WPBeginner+2
- Activate the Plugin:
- Once installed, click the Activate button to enable the plugin on your site.
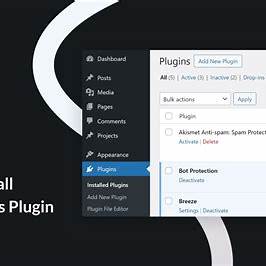
Navigate to the “Add New Plugin” section from the WordPress dashboard.
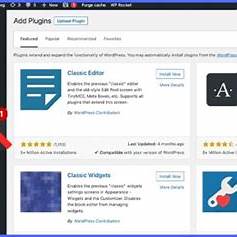
Use the search bar to find plugins by name or functionality.
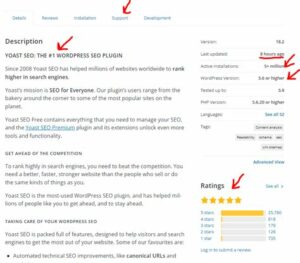
Review plugin details, including description, ratings, and compatibility information.
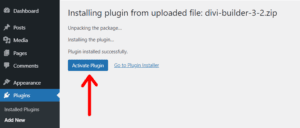
Click “Install Now” to install the plugin, then “Activate” to enable it on your site.
Step 6: Choosing Widgets
Why This Step Is Important
Widgets are essential components in WordPress that enhance your website’s functionality and user experience. They allow you to add various features like search bars, recent posts, calendars, and more to your site’s sidebars, footers, and other widget-ready areas without writing any code. Properly selected and placed widgets can improve navigation, increase user engagement, and provide quick access to important content.WPBeginner
How to Add and Customize Widgets in WordPress
- Access the Widgets Section:
- From your WordPress dashboard, navigate to Appearance > Widgets.
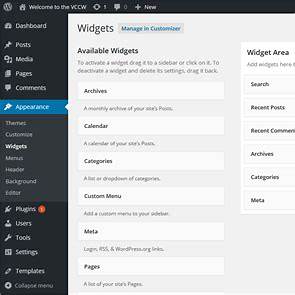
- Available Widgets:
- You’ll see a list of available widgets on the left and widget areas defined by your theme on the right.Toast Websites+3WordPress.org+3GreenGeeks+3
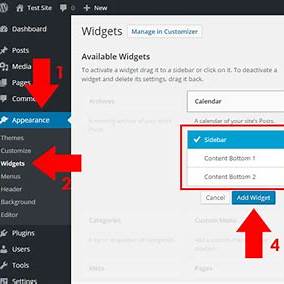
- Adding a Widget:
- Drag a widget from the available widgets list to your desired widget area.
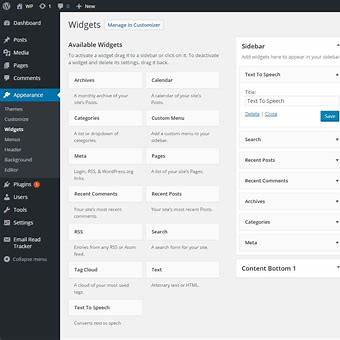
- Customizing a Widget:
- Click on the widget in the widget area to configure its settings, such as title and display options.Pagely+4GreenGeeks+4Kinsta®+4
- Saving Changes:
- After customizing, click the Save button within the widget to apply the changes.
- Previewing Widgets:
- Visit your website to see how the widgets appear and adjust as necessary.
Selecting and customizing the right widgets can greatly enhance your website’s functionality and user experience. Regularly review and update your widgets to ensure they continue to meet your site’s needs and provide value to your visitors.
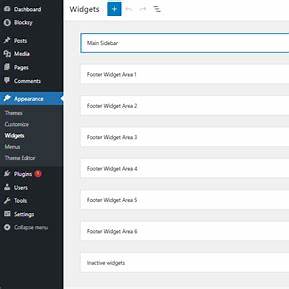
Navigate to the “Widgets” section from the WordPress dashboard to manage your site’s widgets.
Click on the “Add Block” button to browse and add new widgets to your site.
Customize the widget’s settings, such as title and content, to fit your site’s needs.
Drag and drop widgets to rearrange their order within the widget area.
Step 7: Incorporating Email Sign-Ups
Why This Step Is Important
Email sign-ups are a vital component of building a loyal audience and maintaining direct communication with your visitors. By collecting email addresses, you can send newsletters, updates, promotions, and personalized content, fostering engagement and encouraging repeat visits to your site. Unlike social media platforms, email provides a direct line to your audience, ensuring your messages reach them without algorithmic interference.
How to Set Up Email Sign-Up Forms in WordPress
To effectively incorporate email sign-ups, follow these steps:
- Choose an Email Marketing Service:
- Select a reputable email marketing platform such as Mailchimp, Brevo (formerly Sendinblue), MailPoet, or WPForms. These services offer plugins that integrate seamlessly with WordPress.GreenGeeks+5Brevo+5WPForms+5
- Install the Plugin:
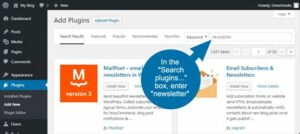
- From your WordPress dashboard, navigate to Plugins > Add New.
- Search for your chosen email marketing service (e.g., “Mailchimp for WordPress”).
- Click Install Now, then Activate the plugin.Newsletter Glue blog+2Visual Composer Website Builder+2GreenGeeks+2
- Connect to Your Email Marketing Account:
- Access the plugin’s settings and enter your API key or login credentials to connect your WordPress site to your email marketing account.
- Create a Sign-Up Form:
- Use the plugin’s form builder to design your email sign-up form.
- Customize fields such as name and email address, and tailor the form’s appearance to match your site’s design.
- Add the Form to Your Site:
- Insert the form into your site’s sidebar, footer, or within posts/pages using widgets or shortcodes provided by the plugin.
- Test the Form:
- Submit a test entry to ensure the form functions correctly and that subscribers are added to your email list.
Incorporating email sign-up forms into your WordPress site is a strategic move to build and maintain a direct line of communication with your audience. Regularly update your email content to provide value to your subscribers, and ensure compliance with email marketing regulations by including unsubscribe options and privacy notices.
Navigate to “Plugins > Add New” and search for your chosen email marketing plugin. Click “Install Now” and then “Activate” to enable the plugin on your site.
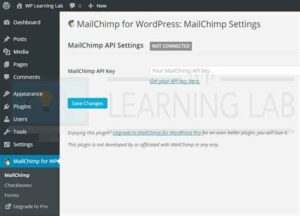
Access the plugin’s settings and enter your API key or login credentials to connect your WordPress site to your email marketing account.
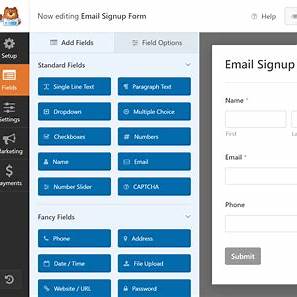
Use the plugin’s form builder to design your email sign-up form, customizing fields and appearance to match your site’s design.
Step 8: Integrating Social Media
Why This Step Is Important
Integrating social media into your WordPress site is crucial for expanding your online presence and fostering engagement. By connecting your website with platforms like Facebook, Twitter, and Instagram, you can:
- Increase Visibility: Reach a broader audience by sharing content across multiple platforms.
- Enhance Engagement: Encourage visitors to interact with your content through likes, shares, and comments.
- Drive Traffic: Attract more visitors to your site from your social media profiles.
- Build Trust: Showcase active social media profiles to establish credibility with your audience.
How to Integrate Social Media into Your WordPress Site
- Install a Social Media Plugin:
- From your WordPress dashboard, navigate to Plugins > Add New.
- Search for a plugin like “Smash Balloon Social Photo Feed” or “Simple Social Icons”.
- Click Install Now, then Activate the plugin.WIRED+5Hosted.com+5WPBeginner+5
- Configure the Plugin Settings:
- Access the plugin’s settings page.
- Connect your social media accounts by entering the necessary credentials or API keys.
- Customize the appearance and behavior of the social media elements on your site.
- Add Social Media Icons or Feeds to Your Site:
- Use widgets, shortcodes, or blocks provided by the plugin to place social media icons or feeds in your site’s sidebar, footer, or pages.
- Test the Integration:
- Ensure that the social media elements appear correctly on your site.
- Verify that links and feeds are functioning as expected.
Integrating social media into your WordPress site is a powerful way to enhance your online presence and engage with your audience. Regularly update your social media content and ensure that your site’s integration remains functional to maintain a dynamic and interactive user experience.
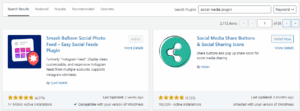
Navigate to “Plugins > Add New”, search for a social media plugin, and click “Install Now” followed by “Activate”.
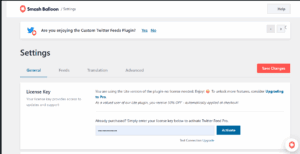
Access the plugin’s settings to connect your social media accounts and customize display options.
Use widgets or blocks to add social media icons to your site’s sidebar or footer.

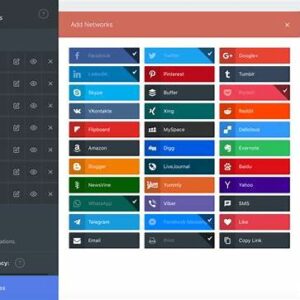
Embed a live social media feed into your site to showcase your latest posts from platforms like Instagram or Twitter.
Step 9: Securing and Backing up Your Site
Why This Step Is Important
Securing your WordPress site and regularly backing it up are two of the most critical actions you can take to protect your content, user data, and all the work you’ve put into building your site. Without proper security and backups, your site is vulnerable to hacking, malware, data loss, and downtime.
Importance of Site Security
WordPress is a widely used platform, which makes it a common target for cyberattacks. A compromised site can lead to:
- Loss of data or access to your site
- Infected pages that spread malware to visitors
- Damage to your reputation and SEO rankings
- The need to rebuild your entire site from scratch
To avoid this, it’s essential to take proactive security measures.
Key WordPress Security Practices
- Keep Everything Updated
- Always update WordPress core, themes, and plugins to patch known vulnerabilities.
- Use Strong Passwords and Limit Login Attempts
- Use complex passwords and install plugins that block brute force attacks.
- Install a Security Plugin
- Plugins like Wordfence or iThemes Security help monitor for threats, enforce secure logins, and block suspicious traffic.
- Use HTTPS/SSL
- An SSL certificate encrypts data and shows visitors that your site is secure. Many hosts offer it for free.
- Disable File Editing in the Dashboard
- Prevent code tampering by disabling file editing with a simple config setting.
- Change Default Login URLs
- Obscuring your login URL can help deter automated login attacks.
Importance of Regular Backups
Even with strong security, things can go wrong — human error, plugin conflicts, or server issues. Backups ensure that if anything happens, you can restore your site quickly without losing everything.
Backups protect:
- Your site’s design and layout
- Blog posts and page content
- Plugin and theme settings
- User data and media files
Recommended Backup Practices
- Use a Backup Plugin
- Plugins like UpdraftPlus, Jetpack, or BackWPup let you schedule automatic backups and restore with one click.
- Store Backups Off-Site
- Save backups to cloud services like Google Drive, Dropbox, or remote servers. Never rely only on your host’s backups.
- Automate the Process
- Schedule daily or weekly backups to ensure consistent coverage without manual effort.
- Test Your Backups
- Periodically test your backups by restoring a copy to a staging site to confirm everything works correctly.
Securing and backing up your WordPress site isn’t just a precaution — it’s a necessity. Think of it like insurance: you hope you never need it, but if something goes wrong, you’ll be glad it’s in place. By implementing strong security measures and keeping up with regular backups, you ensure your site stays safe, stable, and recoverable no matter what comes your way.
Step 10: Implementing E-Commerce
Why This Step Is Important
Adding e-commerce functionality to your WordPress site allows you to sell products or services directly to your audience, turning your website into a powerful sales platform. Whether you’re running a business, offering digital downloads, or selling physical items, implementing e-commerce can generate income, increase customer engagement, and expand your brand reach.
WordPress makes it easy to create a fully functional online store using plugins like WooCommerce, the most popular and customizable e-commerce plugin available.
How to Set Up an E-Commerce Store in WordPress
1. Install WooCommerce
- From your WordPress dashboard, go to Plugins > Add New.
- Search for WooCommerce.
- Click Install Now, then Activate the plugin.
2. Run the WooCommerce Setup Wizard
After activation, WooCommerce will prompt you to complete its setup wizard. This helps you configure basic store settings such as:
- Store location and currency
- Shipping and tax settings
- Payment methods (Stripe, PayPal, etc.)
- Product types (physical, digital, etc.)
You can skip or edit these later, but it’s helpful to complete them at the start.
3. Add Products to Your Store
Go to Products > Add New to begin adding your items:
- Enter a product name
- Write a detailed description
- Set a price and, if applicable, a sale price
- Upload product images
- Select product categories or tags
- Set inventory and shipping options (like weight and dimensions)
You can also add downloadable files or variable products (e.g., clothing sizes).
4. Set Up Payment Gateways
Under WooCommerce > Settings > Payments, enable and configure your preferred payment methods:
- Stripe for credit/debit cards
- PayPal
- Bank transfer
- Cash on delivery
These can be customized depending on how you want to accept payment.
5. Configure Shipping Options
In WooCommerce > Settings > Shipping, you can:
- Create shipping zones (e.g., local, national, international)
- Set flat rates, free shipping, or real-time rates from carriers
- Add handling fees or minimum purchase rules
6. Customize Store Pages
WooCommerce automatically generates key pages like:
- Shop
- Cart
- Checkout
- My Account
You can edit the layout of these using Appearance > Customize or by using a page builder like Elementor.
7. Install Essential E-Commerce Plugins (Optional)
To enhance functionality, consider installing:
- WooCommerce Payments (if Stripe is not preferred)
- WooCommerce Subscriptions (for recurring payments)
- Mailchimp for WooCommerce (for email marketing)
- WooCommerce PDF Invoices & Packing Slips
Implementing e-commerce with WooCommerce gives your WordPress site powerful functionality to handle everything from product listings to secure checkout. It’s scalable, customizable, and integrates with marketing, analytics, and fulfillment tools — making it a smart move for anyone wanting to grow their online presence and revenue.